Tag Archives: refinished

Refinished Kitchen Island

13 Oct

If you’re a DIYer, and you’re anything like me, then you have some unfinished projects around your house. I have about a gazillion. Well, this awesome fall weather we’re having has inspired me to finish up some of these projects. First on the list? Painting and staining this island. 

Refinished Kitchen Island

frig beforea

It used to house our coffee machines before I added the industrial shelving unit. Once I did that I decided to use this piece as an island. And I’m still working on painting that refrigerator. (Remember all those unfinished projects I was talking about?)

Birchwood White

This little makeover was pretty simple. I used some white paint and sandpaper for the base. Birchwood white by Valspar for the first coat  and bright white mystery paint from my basement for the second coat. By the way, this was a free sample of paint. Always check your decorating magazines for a coupon from Lowe’s. Eight ounces of free paint? Yes please.  

DIY Vinegar Stain

For the top I used a DIY vinegar stain followed by a Minwax stain in Dark Walnut. You can read more about the vinegar stain here. It creates a great ashy finish. 

minwaxdarkwalnut

Then I added some simple bun feet using straight top plates.

furniture feet and straight top plates

Before

kitchen island before

After

kitchen island makeover after

No Island

kitchen makeover

Island

painted kitchen islandKitchen island makeoverpainted kitchen islandsteel wool and vinegar stain for island

I always thought our kitchen was too small for an island but it actually makes it so much more functional because it gives us more counter space to work with. It’s a small change but it makes a big difference. So that’s one thing I can cross off the list! What’s on your list of unfinished projects?

Linking up at some great linky parties this week. Liz Marie Blog / DIY Showoff / Rain on a Tin Roof / The Shabby Nest  / Suburbs Mama / Domestically Speaking / Start at Home

stephanie

My Must-Haves for a Cozy Fall Porch

20 Sep

Cozy Fall Porch

It’s finally my favorite time of year. Fall is here! There is just something about fall  that feels like renewal. I don’t know if it’s just the break from the smothering humidity we get in the south, but I feel like I can breath again. With that feeling comes along the need for change. And the need for salted caramel lattes from Starbucks. Oh. My. Word. Have you ever had one of those things? Forget the pumpkin bring me the salted caramel.

Anyway, since we like to spend time on the porch, especially this time of year, I decided to give it a fresh new look and share my “must-haves” for a cozy fall porch.

1. A seat big enough for two. A bench is perfect for a porch. They’re typically small but still big enough for two. I painted this one with three coats of plain old white paint that had been sitting in the basement for-ever. I used this to paint it. 

Graco SprayStation 1900

This thing is where it’s at! It’s the Graco Spray Station 1900. My brother-in-law gave me this for Christmas and I will be forever grateful. It would have taken days to paint all those slats by hand.

Painted Bench Fall Porch

2.Pillows! Pillows are really a must-have in any situation though, right? I made all of these (except for the sequin pillow and the large brown and white pillow) from leftover fabric remnants and an old shower curtain.

DIY Fall Porch Pillows

DIY Fall Porch Pillows

3. A cozy throw. Perfect to curl up in on a chilly night while reading a good book. I picked this one up at TJ Maxx. It’s soooo soft.

Cozy Fall Porch

4. A tray. You have to have a spot for your coffee or hot chocolate. Or wine. ;) I made this tray from an old picture frame and pretty wrapping paper.

Tray for Fall Porch

Tray for Fall Porch

5. Pumpkins! Is there anything more fall than pumpkins? I could go crazy painting and decorating pumpkins but I limited myself to just two. I spray painted these then blinged them out a little. I added a monogram to the black one using nail trim. For the white one I spray painted the backs of some iron-on leaves and hot glued them to the pumpkin.

Painted PumpkinsPainted Pumpkin Fall Porch

Cozy Fall Porch

Cozy Fall Porch

So do you think I missed anything? So looking forward to hanging out on the porch as the nights get cooler! Happy Fall Ya’ll!!

Linking up at some great blogs this week. Hop over and check them out! Liz Marie Blog / A Stylish Interior / The Shabby Nest / Start at Home / Suburbs Mama / DIY Showoff / Rain on a Tin Roof / The Blissful Bee / The DIY Dreamer / Simply Designing with Ashley / One Project Closer

The Lettered Cottage

 photo name_zpse215d949.png

Bedroom Makeover: A Much Needed Change

22 Aug

Hey y’all! Hope you’re all having a great week. Mine has been a little rough. We had to say goodbye to our sweet little Lola. She was our furry baby and it was devastating to have to let her go. But I won’t dwell on that. I just want to say that we are so thankful to have been blessed with her in our lives and we SO appreciate all the kind words and prayers from everyone.

Anyway, I had been planning to give our bedroom a much needed freshening up and after what happened this week it seemed like the perfect time to just get in there and get it done. It was a GREAT distraction. There are still a few more things I want to do, like paint a white wall, add some artwork, and add a new light fixture and some accessories. But I did get a lot done and now it feels fresh and crisp. Exactly what we needed. 

Eclectic Bedroom Makeover

Coral Grey Indigo White Bedroom

Painted Bamboo Wicker Chair

Gold Painted Wicker Bamboo Chair

DIY Upholstered Headboard

Grey Bedroom RugLolaCheck out these before pictures.

Bedroom Before

Bedroom Before

This is what I’ve done so far. 

  • Painted the bamboo chair in white and gold. Covered the seat cushion in a grey/white greek key fabric. 
  • Reupholstered the headboard in a bright white fabric and added a nailhead trim. I used a table cloth from Target. 
  • Replaced the wooden storage bench with an upholstered ottoman. 
  • Pulled the white duvet cover from the guest room and kept the Nate Berkus indigo pillow shams. (If you’ve been following for a while then you know I was determined to use some of that indigo blue bedding). 
  • Added one of my DIY Gold Painted Pillows along with some other new and old toss pillows. 
  • Added a new rug from Garden Ridge. 
  • Hung a set of mirrors above the bed. I found those at Target. I was trying to create the illusion of a taller headboard. 

Bamboo Wicker Chair Before and After

Bedroom Before and After

I totally believe that if you make your home a happier place you’ll be a happier person. That was pretty much the goal this week, to make our home a happy place to be.

Thanks so much for stopping by. Have a beautiful weekend!

 photo name_zpse215d949.png

Linking up to some fab linky parties this week.

Liz Marie Blog

If It’s Not Baroque

The Shabby Nest

Suburbs Mama

DIY Showoff

Rain on a Tin Roof

Homecoming

The Blissful Bee

A Stylish Interior

DIY Gold Painted Pillows

2 Aug

I have a quick project to share with you today. It’s really easy and can be done in an afternoon. diy gold painted pillows

If you have some pillows you want to jazz up then this is for you. Martha Stewart Metallic Paint. Every time I went to Home Depot I would eyeball this paint. I don’t know what took me so long but I finally bought some.

Martha Stewart Gold PaintThere are about a hundred things I wanted to use this paint on but I decided to start with these plain toss pillows I made a while ago. They were nothing special. I had simply sewn together some old fabric swatches I had lying around. They are so much better now.

This is what I started with.

Martha Stewart Gold Paint

DIY painted pillow

DIY painted pillow

Yeah they are FAR from perfect but keep in mind sewing is “not mah thang”.

I taped off the first pillow so that I would end up with two bold stripes through the center of the pillow. I measured about 3 1/2″ between the strips of tape.

DIY painted pillows

Once I started painting I quickly realized it would work much better with a paint brush.

DIY gold painted pillow

The fabric is textured so it was easier to get the paint to stick in all the grooves with a brush.

A couple of things I learned about painting fabric. 

  • Paint on top of and away from the tape. Not toward it. It felt like the paint would easily slide under the tape.
  • Don’t put a lot of paint on the brush but saturate the fabric really well so you only have to apply one coat.

For the second pillow I wanted a diagonal pattern so I placed the tape in diagonal strips about 3″ apart.

DIY gold painted pillow

This is how they turned out.

diy gold painted pillows

diy gold painted pillowsdiy gold painted pillowsdiy gold painted pillowsdiy gold painted pillows

This was so easy. Seriously, it only took a couple of hours including dry time. I LOVE this paint. Thanks Martha! I can’t wait to try it on some other things. Until now, painting something gold required spray painting which meant if it was raining I could forget it. Oh, and it’s kind of hard to tell in the photos but it has a GORGEOUS metallic sheen and it isn’t as deep of a gold that you get from most spray paints. LOVE!

I’m still playing around with where I want to keep the pillows but for now they look pretty good in the living room. Oh, and I now have new inspiration to refinish our dining chairs. Maybe I can get to that soon….

So have you ever painted fabric? Share!!

This is where I’ll be linking up this week. Come check it out!

Liz Marie Blog

Suburbs Mama

DIY Showoff

Give Me the Goods Monday @ Rain On a Tin Roof

If It’s Not Baroque

The Blissful Bee

Home Coming


 photo name_zpse215d949.png

$40.00 Bathroom Mini-Makeover

27 Jul

Bathroom Mini Makeover

Bathroom After

Recently I mentioned that Garden Ridge just opened up in the neighborhood. On my recent shopping trip I found tons of great things to be had but this is one of the few things I actually left with.

Shower curtain

I love love love ikat or anything ikat-ish and lately I’ve been feeling indigo blue. When I saw this I knew that I wanted to use it in the upstairs bathroom. Especially since I already had this paint sample from Lowe’s.

Valspar Pine Green

I picked  it up when they were giving away free samples in the spring. I had been thinking about using it to paint a small cabinet that I wanted to use in the bathroom and when  I found that shower curtain I knew it would be per-fect.  Except I’m not using it as a shower curtain. I bought two of them to use as panels over the window shades.

This is the bathroom before. This cabinet was all kinds of wrong in here. Too tall and not a great color.

Bathroom Before

And now!

Bathroom After

Here is a before and after of the small cabinet.

Cabinet before

Pine Green Painted Cabinet

This cabinet used to be in the downstairs bathroom but that’s going to be getting a big makeover soon. OK , so that’s not all.  I also made some simple DIY art.

DIY Art

The one on the left is a card that we received with one of our wedding gifts and the one on the right is a picture from a wedding magazine that I had from planning our wedding. I already had the frames but one of them did get a coat of spray paint.

 I love turning personal items into artwork. Especially a card, since I know that underneath the glass are the sweet words of a friend.  (FYI, we got married six years ago.)   I also hung a DIY sunburst mirror on the wall above the bathtub. It’s so fun! It peeks out from between the shower curtains.

DIY Art

I painted the corners of the little leaning mirror (on the right) with Rub n Buff in Silver Leaf AND I painted the frame of the medicine cabinet mirror in the same color. The wooden letter that’s behind the sink (it’s hard to tell in the photo but it’s a Q) was purchased in the clearance aisle of Hobby Lobby for $.75.

Pine Green Painted Cabinet

Frog Tape Painted Cabinet

I’m thinking the wall still looks a little empty so I might go ahead and just turn that into a gallery wall. Otherwise, I’m pretty happy with the way it turned out. All in all I only spent around $40.00 to update the bathroom by using mostly things we already owned. That’s my kinda makeover.

Oh I should mention, the original makeover of this bathroom was done several years ago by my husband and his brother. New flooring, faux concrete counter….those guys can do anything. Seriously they could have their own show. 

Happy Weekend!

You can find me linking up this week at the following awesome blogs.

Suburbs Mama

Liz Marie Blog

The Shabby Nest

DIY Showoff

Give Me the Goods Monday at Rain on a Tin Roof

The Blissful Bee


 photo name_zpse215d949.png

Coral Chest: My Obession Continues

17 Jul

coral painted chest

As my obsession with coral gets totally out of control I find myself wanting to use more of it in every room.  I am totally obsessed with coral. I found this chest at a thrift store and it was in great condition. It’s the perfect size for the guest room and it has a decent amount of storage space. It was screaming to be painted coral.

This is the before.

thrift store chest

Once I got it home and started painting it I was pretty surprised to find this.

coral painted chest

It’s from Pier One! I’ve never bought any furniture from Pier 1 and this piece is the real deal. It’s actual wood.

I painted this piece starburst orange which is a Benjamin Moore color but I used a combination of Valspar and Glidden paints.

Since I wanted to use the original ring pulls WITHOUT the plates behind them I had to make an adjustment. I used Plastic Wood to fill in the holes that had been drilled to hold the plates. Plastic Wood is perfect for this kind of job because it can be painted or stained.  Once it was sanded and painted there was zero evidence of the outer holes.

wood filler to change hardware

I spray painted the pulls with metallic gold spray paint by Ace Hardware.

Gold spray paint & Rub n Buff

Then I used Rub-n-Buff in gold leaf to paint these weird little accents.

gold leaf rub n buff

Much better.

It’s perfect next to my little chair with the DIY spot fabric.

coral chest before and after

painted coral chest

I finally have a little extra storage for my clothes which means it doesn’t constantly look like a clothes bomb exploded in here. So are you obsessing over anything lately? I would love to know I’m not the only one!

I’m linking up this week at the following AMAZING blogs.

Liz Marie Blog

Miss Mustard Seed

Suburbs Mama

Finding Fabulous

DIY Showoff

Give Me the Goods Monday at Rain on a Tin Roof

A Stroll Thru Life

The Blissful Bee

Domestically Speaking

Not Just a Housewife

Start at Home


 photo name_zpse215d949.png

A Little Somethin’

15 Jun

I’ve had this chest for-e-ver. With my new motivation to finish our bedroom I decided it was time to give it a makeover.

DIY nail trim chest

This is what it used to look like.

BEFORE

DIY painted nightstand

painted nightstand before

I finally painted it. White. I know, nothing super exciting. After I painted it I was kinda like, that’s it?

It just needed a little something else. So I added some nail heads. Just on the corners. I used the singles that I had left over from my wine cabinet makeover.

NOW

DIY nailhead trim nightstand

DIY nailhead trim

DIY nail trim accents

DIY nail trim accent

DIY Nail Trim Accent

The top was pretty beat up and still looked a little rough after I painted it. It also has a lot of “worm holes”.  So I thought it would look kind of cool to add a modern element to a piece that has a “worn” and traditional look.

It was so easy. I just hammered each one in with a rubber mallot. I think that gave it a little extra oomph. Sometimes you just need a little extra somethin’.

Happy Weekend Everyone!!

 photo name2_zpsf5f56755.png

I Have No Idea What I’m Doing

10 Jun

Here I go changing my mind again. I just CAN’T decide what I’m doing about our bedroom.

I was going for something like this.
black white brown bedroom

decor pad

So I painted the room Bittersweet Chocolate.

Bittersweet Chocolate

But then I found this bedding.

Nate Berkus Bedding

Nate Berkus

I fell in love with it and was thinking I wanted to mix it with some pretty yellows but that just wouldn’t work with the Bittersweet Chocolate.

Plus I’m still not over my obsession with coral-y pinks. So I put this together on Olioboard.

grey coral indigo bedroom

I love this paint color called Storm but I really don’t want to paint again. I know, I’m all over the place. So my dilemma: Do I work with the Bittersweet Chocolate or paint the room? Again.

 photo name2_zpsf5f56755.png

Small Space Solution: DIY Industrial Shelves

7 Jun

DIY Industrial Shelves

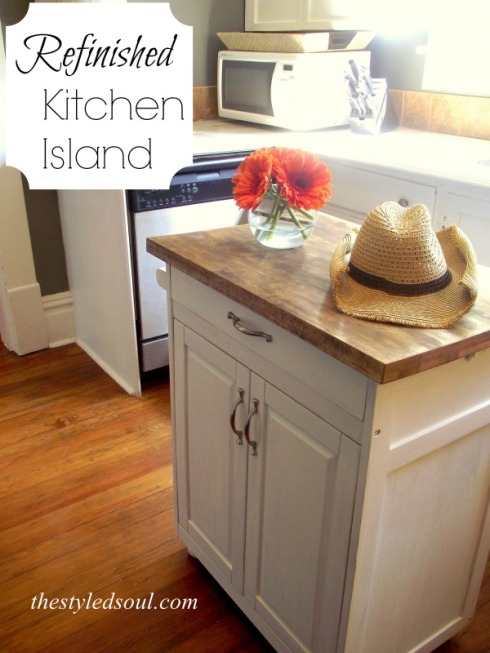
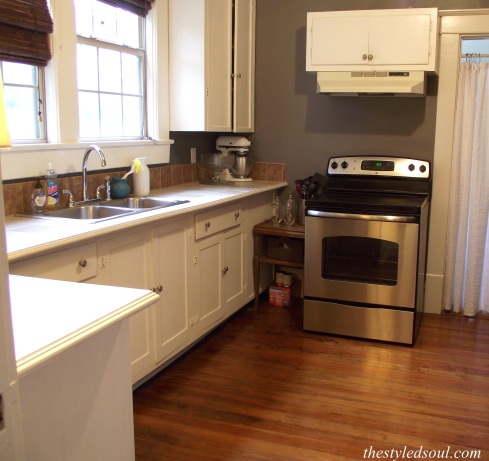
I love our home. It’s old and has lots of old house charm but it’s also small and storage space is limited. Because of this I have always struggled with keeping things organized in the kitchen.

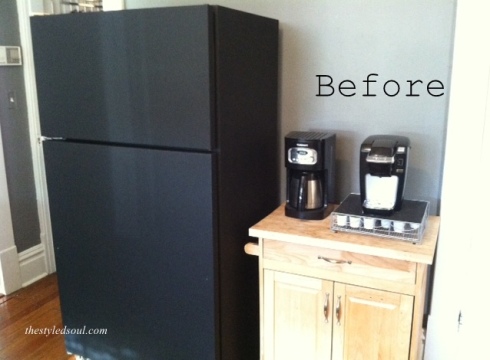
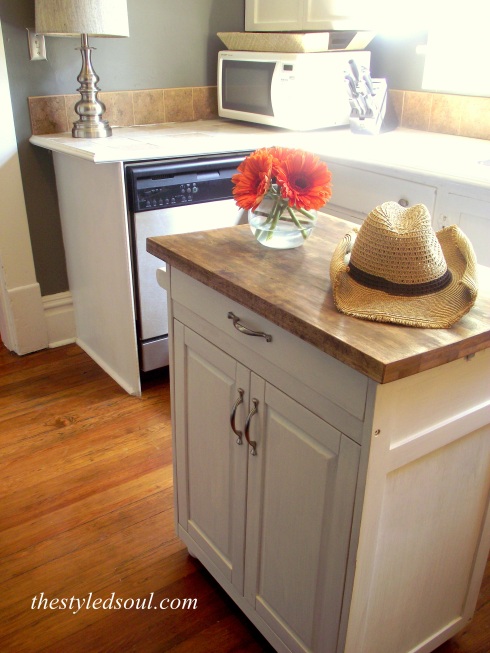
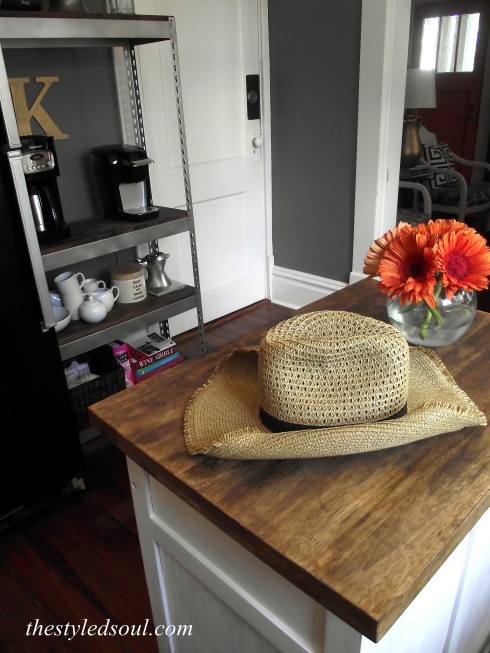
After I started painting the refrigerator I started thinking about ways I could make better use of the space next to it. I decided I wanted something taller and with shelves. This would allow us to keep the coffee makers where they are (which frees up counter space) and also give us more storage.

I found this at World Market for $89.99.

wmshelf

I love the looks of it but it just wasn’t big enough. After a little more searching I just couldn’t find anything I wanted in my price range so I decided to make one using the World Market piece as my inspiration.

I found this at Home Depot.

Gorilla Rack

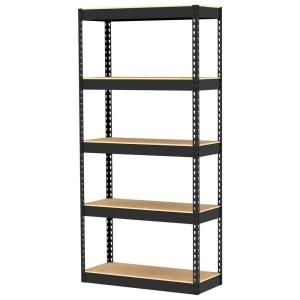
Gorilla Rack Free Standing Storage Unit

The metal is almost exactly the same as the World Market piece which is one reason I chose it. The second great thing about it is that it’s the perfect size for my space and third it claims to hold 250 lbs per shelf.

The makeover was really pretty easy. Spray paint my friends, spray paint. I went with a metallic silver finish because I thought it would look good next to the freshly painted black refrigerator (which is almost finished). I used a combination of the following three spray paints.

  1. Brushed Nickel by Valspar
  2. Dull Aluminum  by Krylon
  3. Hammered Metal by Krylon

I gave it one coat of the brushed nickel followed by a coat of the dull aluminum. Then I randomly sprayed sections of it with the hammered metal. I wanted it to have dimension and look a little less new.

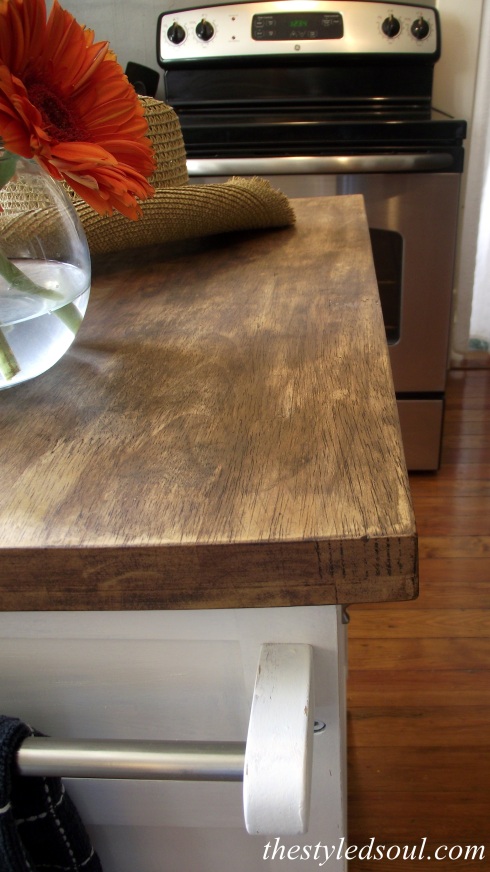
I didn’t want to use the particle board shelves that came with it. I wanted actual wood shelves. So I took one of the shelves to Lowe’s and picked out the type of wood I wanted from the Lumber Isle. Then I just gave the very nice wood cutter guy the particle board shelf  and asked him to make the boards the same size.

lowes

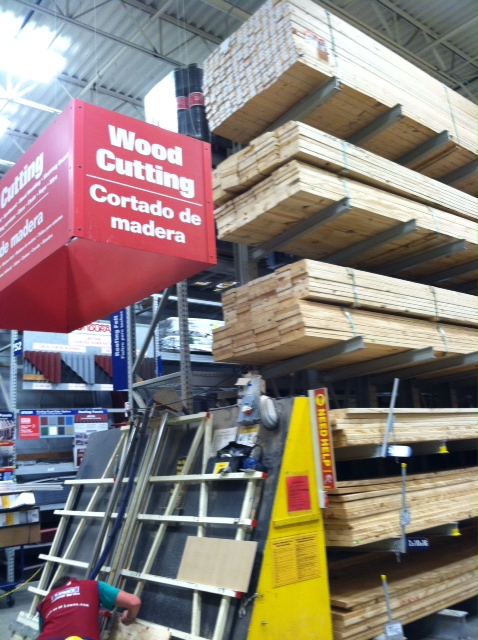
I love the people that work at Lowe’s!

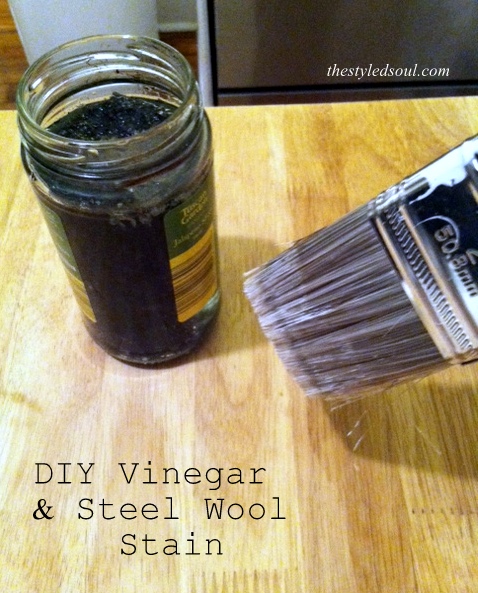
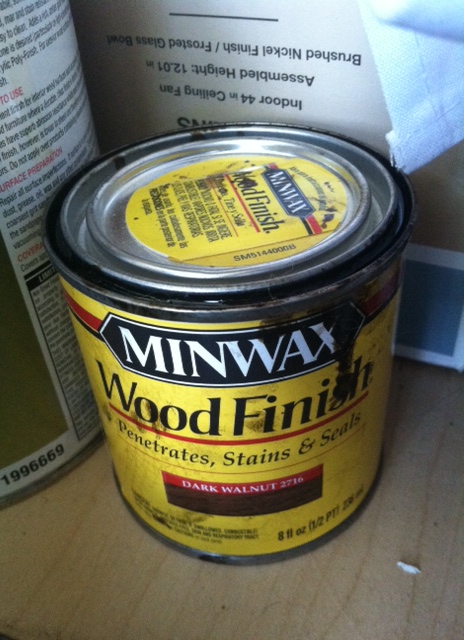
I chose paint grade pine. I knew it would give me the look I was going for. So I sanded them down and stained them with one coat of vinegar soaked in steel wool then I stained them with a layer of Min-wax in Dark Walnut.

DIY Industrial Shelves

I used the scraps of  wood that were left over when they were cut to test the stains first. Always keeps the scraps so you use them for testing when using a new paint or stain.

I decided I liked the richness of the stain over the vinegar. Now if you are going to be using anything that could get these boards wet, like coffee makers,  then you will want to apply a polyurethane. I recommend Rust-Oleum Polyurethane  in matte finish. It protects the wood really well without any shine.

I let the boards dry overnight before I put anything on them.

DIY Industrial Shelves

DIY Industrial Shelves

DIY Industrial Shelves

DIY Industrial Shelves

DIY Industrial ShelvesDIY Industrial Shelves

After buying everything I needed for this shelving unit I still spent less than I would have on the piece from World Market. Plus it’s bigger and it’s the exact color that I wanted.

If you want to do something like this for your own home you can usually find these shelving units at Home Depot and Lowe’s in various sizes and styles. Home Depot offered free shipping to their store which was perfect for me. You could possibly find these on Amazon as well.

So what do you think? Would you use something like this in your kitchen or do you prefer that everything be hidden?

Have a great weekend everyone and Happy DIYing!!!

These are the fabulous blogs I’m linking up at this week.

GrabButtonLiz

TDC Before and After


Bling-y Bentwood Rocker

25 May

I have a problem. I’m somewhat addicted to gold spray paint. I feel the need to paint ev-er-y-thing gold. It just adds a touch of drama. I love that.

painted bentwood rocker

My dad gave me this old Bentwood rocker and I took it without much excitement.  I put it in the basement and forgot about it for a while until  one day when I just felt the need to paint something.

bentwood rocker

So I took it outside and painted it blue.

blue bentwood rocker

Yeah…not so much. Huge fail.

Then I put it back in the basement and forgot about it for a while. Again. Well, shortly after that my obsession with gold spray paint began and I had been thinking about all the different things I could paint gold. That’s when I remembered the rocker. I’m loving the new glam look.

painted bentwood rocker

So much better than the blue.

painted bentwood rocker

I just covered and taped off the wicker and spray painted the rest with gold metallic spray paint. I used both Valspar and Ace brand paint. Both are terrific spray paints. Then I used a paint brush to paint the wicker in Balboa Mist.

painted bentwood rocker

painted bentwood rocker

I still haven’t decided where it will stay but  I will probably put it in the living room. It would also be a great bedroom chair.  How cute would this be in a little girl’s room?

Do you have a go-to color for spray painting? I would love to know! Leave a link to your projects in the comments section.

Hope everyone has a fun holiday weekend!

This week I’m linking up at some very cool blogs. You should check them out.

http://madeinaday.com/2013/05/23/made-u-look-linky-72/

http://www.classyclutter.net/2013/05/spotlight-saturday-link-party-6.html

http://suburbsmama.blogspot.com/2013/05/sunday-linky-party-9.html

My Uncommon Slice of Suburbia
Liz Marie Blog

startathome.blogspot.com
Stephanie