Tag Archives: fabric

Coastal Eclectic Bedroom Chair

4 Oct

It’s so hard to leave the beach. If you follow me on Instagram then you know we just spent a week at the beach doing absolutely nothing. And it was awesome. This was my view pretty much everyday. 

Miramar Beach


It’s kinda hard to get back into the groove of reality but at the same time it’s really good to be home. Anyway, we did a little thrifting while we were there. I love thrift shops in beach towns, they always have the best stuff. While I didn’t bring anything home with me I did remember that I never really shared the makeover of the chair I bought last year at the beach.

 Yep, LAST year. And it was only 20 bucks.I bought it not knowing exactly where I wanted to use it but I knew at some point it would be perfect somewhere. How’s that for vague? This is what it looked like when I bought it. 

wicker chair before

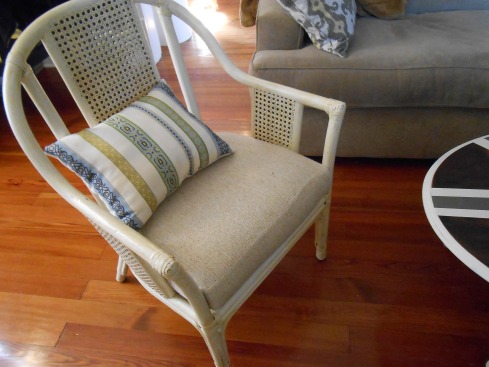
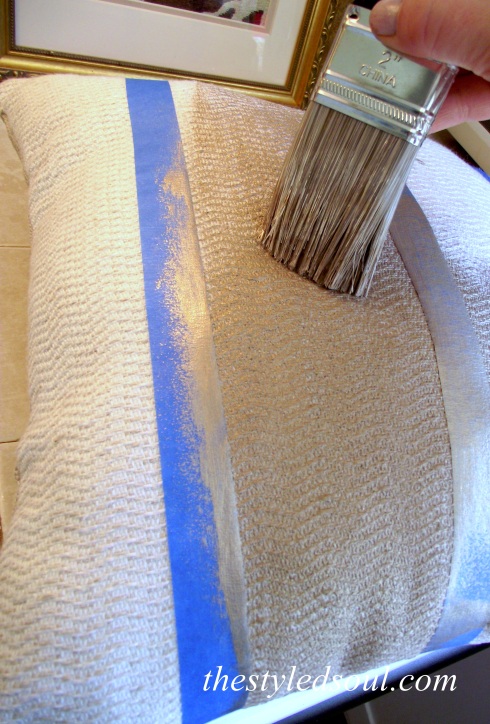
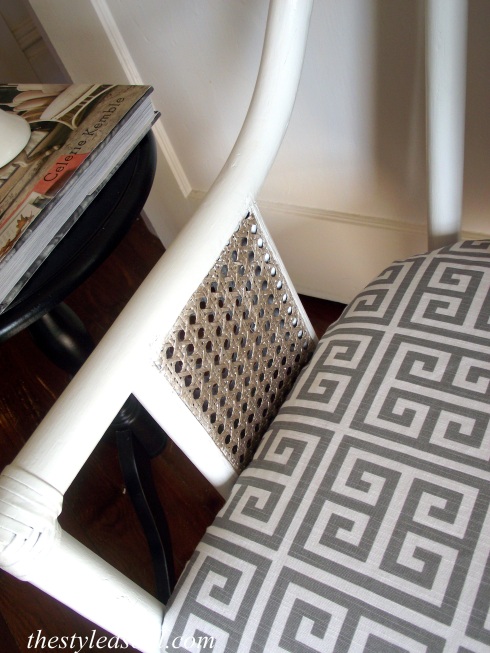
It was a little dirty and a lot blah. It was in great shape though and it’s really comfy.Once I gave our bedroom a little makeover I knew  exactly what to do with the chair.I started by spray painting it white but I knew it needed something else. So I broke out my favorite Purdy brand paint brush to paint the wicker.

martha stewart gold paint

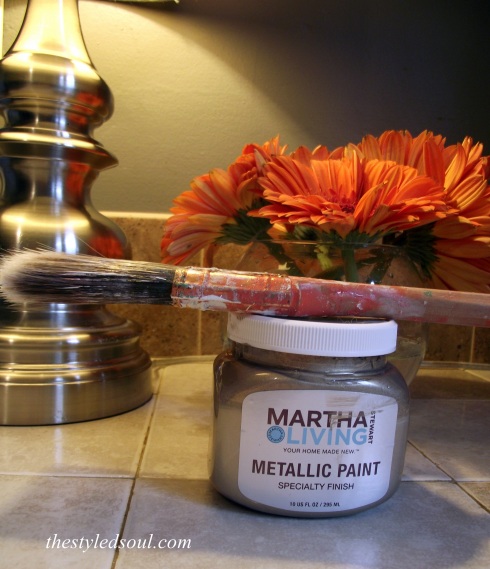
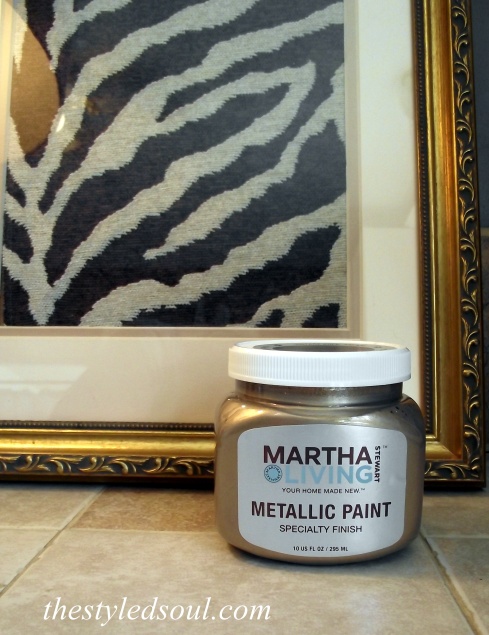
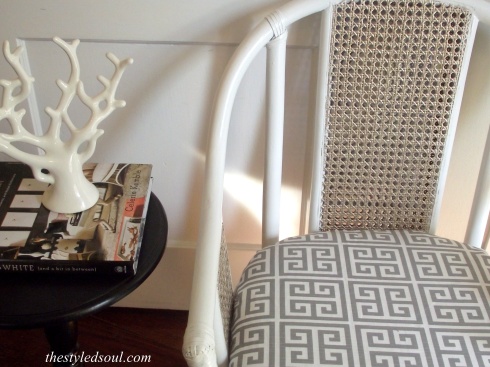
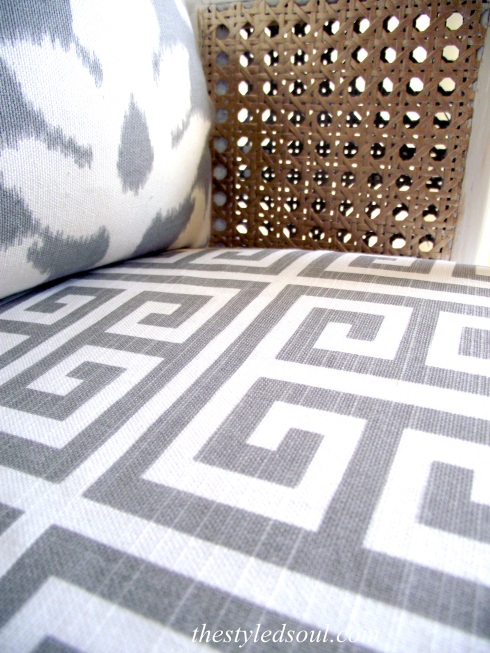
I painted it with this  Martha Stewart Specialty paint in Vintage Gold. This is absolutely one of my favorite gold paints. It has the best shimmery gold finish. 

greek key fabric

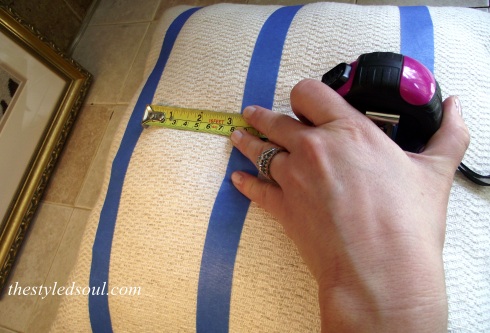
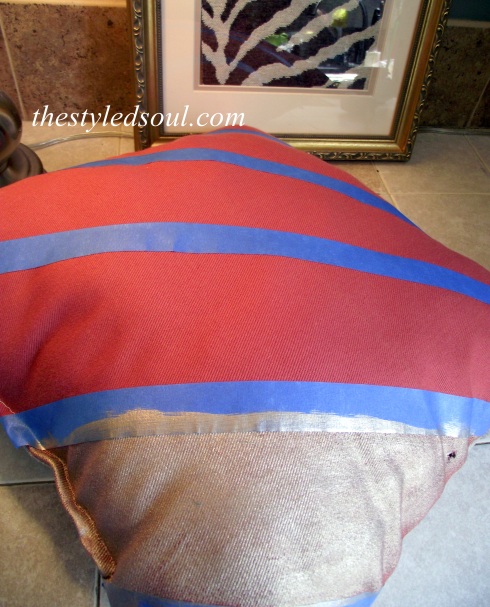
Then I recovered the cushion in this greek key fabric. I found it on the remnant table at Hancock Fabrics. I geeked out a little bit right there in the store when I found it. It’s pretty rare to find something this fab so cheap. They sell remnants for around $5.00-$6.00 per yard.  I got about four yards so you’ll be seeing this fabric again.

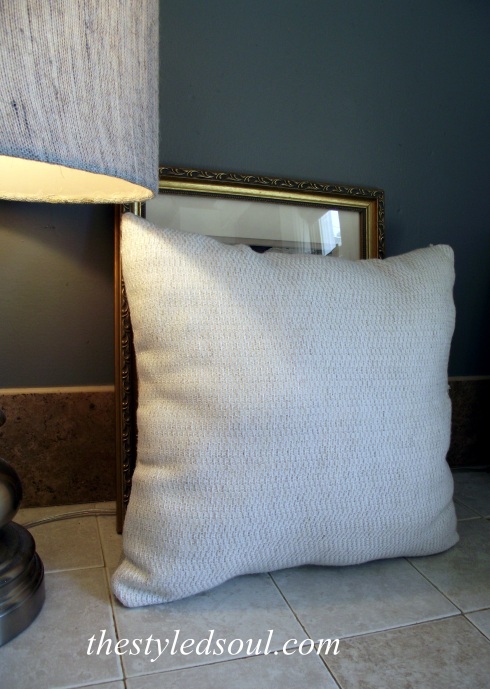
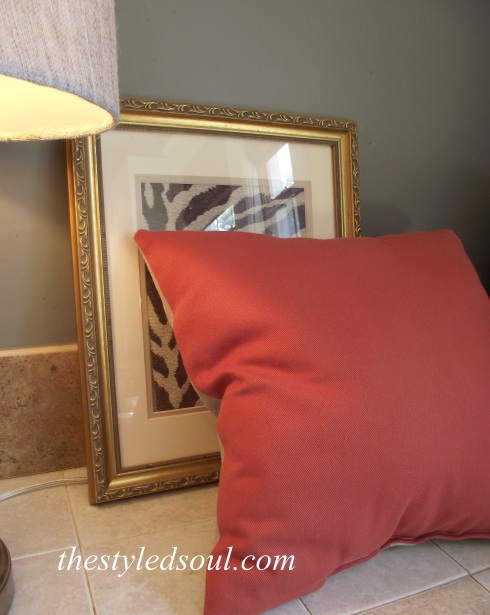
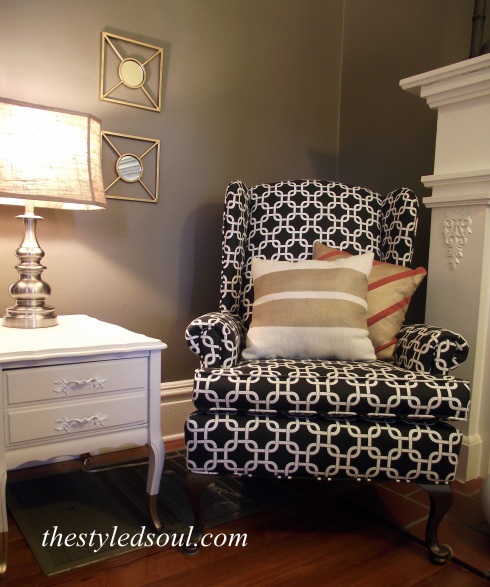
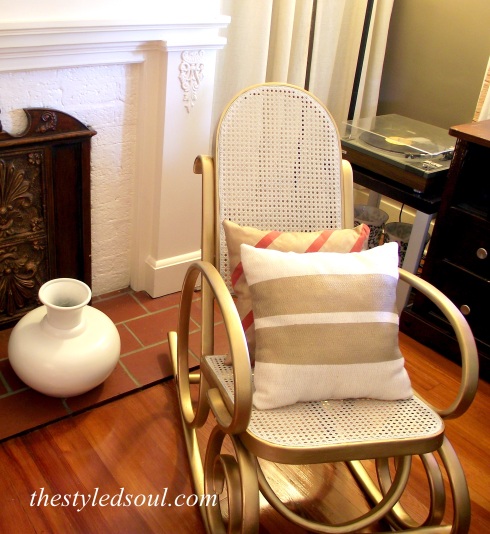
Then I went back and forth with these two pillows.

I decided I like the grey one best. I love the mix of the patterns in the neutral tones and I especially love it against the shimmery metallic paint.

Wicker Bamboo CHair

Wicker Chair painted Gold and White

Wicker chair with greek key fabric

Wicker gold greek key ikat

wicker bamboo chair

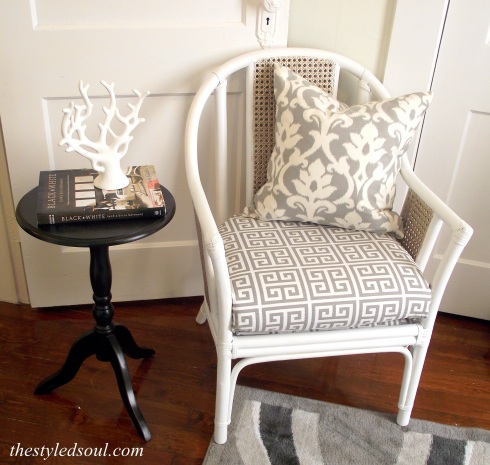
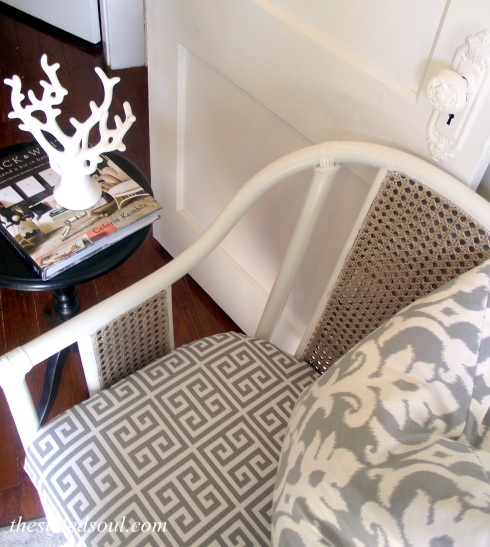
So it only took a year but it did finally get a makeover. Sometimes that’s how long it takes to get something right. It took me the longest to decide what to call this chair but I think it’s kinda coastal and kinda eclectic. So there ya go. You may have noticed I started painting the bedroom. No more Bittersweet Chocolate!  I can’t wait to get it finished so I can show you how much better it looks. And cross it off my list….

This is where you will find me linking up this week. Liz Marie Blog / The Shabby Nest / Suburbs Mama / Rain on a Tin Roof / The Blissful Bee / The DIY Dreamer

stephanie

DIY Gold Painted Pillows

2 Aug

I have a quick project to share with you today. It’s really easy and can be done in an afternoon. diy gold painted pillows

If you have some pillows you want to jazz up then this is for you. Martha Stewart Metallic Paint. Every time I went to Home Depot I would eyeball this paint. I don’t know what took me so long but I finally bought some.

Martha Stewart Gold PaintThere are about a hundred things I wanted to use this paint on but I decided to start with these plain toss pillows I made a while ago. They were nothing special. I had simply sewn together some old fabric swatches I had lying around. They are so much better now.

This is what I started with.

Martha Stewart Gold Paint

DIY painted pillow

DIY painted pillow

Yeah they are FAR from perfect but keep in mind sewing is “not mah thang”.

I taped off the first pillow so that I would end up with two bold stripes through the center of the pillow. I measured about 3 1/2″ between the strips of tape.

DIY painted pillows

Once I started painting I quickly realized it would work much better with a paint brush.

DIY gold painted pillow

The fabric is textured so it was easier to get the paint to stick in all the grooves with a brush.

A couple of things I learned about painting fabric. 

  • Paint on top of and away from the tape. Not toward it. It felt like the paint would easily slide under the tape.
  • Don’t put a lot of paint on the brush but saturate the fabric really well so you only have to apply one coat.

For the second pillow I wanted a diagonal pattern so I placed the tape in diagonal strips about 3″ apart.

DIY gold painted pillow

This is how they turned out.

diy gold painted pillows

diy gold painted pillowsdiy gold painted pillowsdiy gold painted pillowsdiy gold painted pillows

This was so easy. Seriously, it only took a couple of hours including dry time. I LOVE this paint. Thanks Martha! I can’t wait to try it on some other things. Until now, painting something gold required spray painting which meant if it was raining I could forget it. Oh, and it’s kind of hard to tell in the photos but it has a GORGEOUS metallic sheen and it isn’t as deep of a gold that you get from most spray paints. LOVE!

I’m still playing around with where I want to keep the pillows but for now they look pretty good in the living room. Oh, and I now have new inspiration to refinish our dining chairs. Maybe I can get to that soon….

So have you ever painted fabric? Share!!

This is where I’ll be linking up this week. Come check it out!

Liz Marie Blog

Suburbs Mama

DIY Showoff

Give Me the Goods Monday @ Rain On a Tin Roof

If It’s Not Baroque

The Blissful Bee

Home Coming


 photo name_zpse215d949.png

Here I Go Again

22 Jul

I’m back at it again. Making more design boards for the bedroom. I still haven’t decided if I want to leave the room painted Bittersweet Chocolate or repaint it a lighter shade. Lately I’ve been finding myself drawn to white rooms. There is just something so fresh and clean-looking about a white room.

It makes me think of that song by the Dixie Chicks, Wide Open Spaces. Except in my brain it goes, WHITE Open Spaces. Yeah, that song is gonna be stuck in your head all day. You’re welcome. Anyway…..what I’m thinking about now is leaving one wall Bittersweet Chocolate and painting the rest of the room a soft white. Maybe ;)

Here is my latest design board for the bedroom. 

Styled Soul bedroom design board

This is the plan:

  • Reupholster the headboard in a coral ikat fabric.
  • DIY some white window panels with some type of gold border.
  • Hang some antiqued mirrors/frames. 
  • Bring in my DIY capiz shell chandelier from our little home office.
  • The indigo blue will come from the Nate Berkus bedding I already own. (I know what you’re thinking but it’s working in my mind.)
  • Buy one of these chests I found at Garden Ridge. 

grey mirrored chest garden ridge white mirrored chest garden ridge distressed white mirrored chest garden ridge mirrored chest garden ridge

These chests are all $199.00 or less! So happy they moved into the neighborhood!

The white dresser is from my guest room and I should be able to pick up some mirrors and picture frames at a thrift store for practically nothing.

That’s the plan for now. Just gotta get it done!

 photo name_zpse215d949.png

DIY Painted Spot Fabric

2 Jul

DIY painted fabric

Have you noticed a trend in fabric lately? This really cool black and white spotted fabric that’s half polka dot half cheetah print? It has such an eclectic chic vibe.

black white spot wallpaper

I’m drooling over these images from pinterest.

tommy smythe living room

How amazing are these chairs in this living room by Tommy Smythe?

spot pilliw furbish

I’m loving this pillow from Furbish Studio.

I was feeling super inspired by all these looks. I LOVE this fabric and was dying to use it somewhere.

spot fabric

I found this great fabric at Warehouse Fabrics Inc.

I could have ordered a yard of it but I just happened to have some white fabric and of course I had some basic black paint. So I decided to make my own ;)

It was super easy. Seriously,  if I can do this anyone can. These are the things you will need.

  • Fabric
  • Paint
  • A basic sponge
  • Scissors
  • Paper plates
  • Paper towels

Take a basic cleaning sponge and pull it apart lengthwise so it isn’t as thick. Then cut out two or three circles. They don’t have to be perfect.

painted fabric

Next,  iron your fabric and lay it on a flat surface. Pour some paint into a paper plate and place an empty paper plate next to it (this is where you will keep your sponge circles) along with some paper towels.  Now that the set up is ready you can start the “painting” process.

I didn’t really go with a pattern since I wanted the spots to look kind of random. I just started in the center and worked my way out. I had three pieces of sponge cut out and I started with the biggest one. I dipped the sponge in the paint, pressed the excess off on the paper towel then pressed the “spot” onto the fabric. I could get about two or three spots on the fabric from each dip in the paint but I did have to go over some of the spots that didn’t look like they had enough paint.

This is what it looked like just after I started.

painted fabric

And this is what it looked like when I was finished.

DIY Painted spot fabric

I just hung it with a clipped pants hanger to dry overnight then I covered this little chair seat with it.

diy painted fabric

DIY painted fabric DSCF3936a

Maybe next time I’ll try it on the wall. Should I?!?!

 photo name_zpse215d949.png

Metallic Desk Chair

14 Mar

Ch-ch-ch-changes….

label chair

So I have been making a few changes around here. I tend to do that a lot. Anyway, the dining room just wasn’t coming together the way I wanted it to and we NEVER ate at the table. So I thought, what’s the point? That’s when I decided to make better use of our space by rearranging some things. I moved the dining table, chairs and china cabinet into the living room and moved my desk and storage chest into the dining room, which is now the office. It’s all workin’ for me now. The best part? We actually eat at the table now. Love it.

Ok, back to the point. The desk chair just wasn’t right ever since I painted the coral stripes inside the desk and especially since I moved it into a room with such a dark wall color. I think I just needed a little bling.

So I painted it with two coats of Valspar metallic spray paint in gold. I’m really into metallics lately, especially gold. This spray paint is one of the best I have ever used. It covers really well and I still have some leftover, even after using it on another small project. I debated priming the chair first but I was afraid it might end up being a little brassier than I wanted since the primer I had was white.  So I just went for it.

spray paint

Then, I used a staple gun to recover the seat in one of my favorite patterns, an animal print in shades of black and grey. I thought that would tie in well with the desk and the wall color.

This is what the chair looked like before.

DSCF2420 DSCF2419

This is what it looks like now.

deskchairpin

I also hung a memo board I made out of a piece of corkboard and a shower curtain I found in the clearance section at Target. It’s a great spot to pin fabric and paint swatches.

corner cropped chair cropped chair2 DSCF3004 DSCF3010

Now I just need something to hang above the desk and MAYBE a small craft table for the center of the room. Turning this room into an office was definitely the way to go since it is a much better use of our space. I love it now and use it everyday.

P.S. I’m linking up this post to emilyaclark.blogspot.com. Check out her blog. You’ll love it! WWWYHbutton6

sig1

Pinterest Adventures: Dog Beds

31 Jan

I’ve been using Pinterest a lot lately. There are so many beautiful pictures and great ideas to be found! Sometimes I pin things and sometimes I don’t, even if I love it. I try to pin things only if it’s something I know I want to try or if it inspires me in a major way. Many things I have pinned and forgotten about but there are many things that I have actually tried. A lot of them have been successful and some others not so much. Anyway, I thought I would share some of my Pinterest adventures here.

DSCF4184

Anyone that knows me well knows about Lola. With itty bitty legs, she’s unable to hop up on onto anything so she spends a lot of time on the floor when we aren’t home.  So I’m always on the lookout for cute dog beds that she can hang out in rather than the hardwood floor. Imagine my excitement when I found this tutorial on Pinterest  on how to turn an old side table into a four- post dog bed!

0a08c6806fd22f2900ca381670404344

The original source is lucydesignsonline.com.

DSCF2367

This is the table I used to make the bed.

Well actually, I used one that looks just like this. We had two of them. This one is still a nightstand.

I took the top shelf off and painted it with a sample of paint I already had. Then I sewed the cushion for the bed using leftover fabric from the headboard in our bedroom. All that was left was to sew some cute little pillows using fabric scraps.

DSCF4184

DSCF3822

A free custom dog bed. This is why I love Pinterest!

So do you use the things you pin? Show them off! Post a link in the comments below. Come on, you know you want to.

sig1

Wing Back Update!

8 Nov

Look who got a makeover!

If you remember, I found this chair at a thrift store for $14.99. I knew I wanted to have it covered in a geometric pattern I just couldn’t decide what color I wanted to use.  I couldn’t decide between a more neutral grey or a fun coral. Well I have since painted the inside of the front door coral and that seemed to give me the color fix I needed so I decided to go with a neutral. I found this black and white fabric on Amazon.com and it was only around $6.00 per yard!

I knew that black would be just as neutral as grey and would actually be a little bolder in the room, which is what I really wanted without having to commit to a specific color. Oh, and I had an amazon gift card!  So I ordered the fabric and got the chair to an upholsterer.

Here’s the chair before.

I’m so happy with how it turned out and how our little living room is coming along. While I’m on the subject, here are a couple of living room before shots. Like way before.

And now…

I love the element the chair brings to the room with the mixture of the modern fabric and the traditional wing back style. The best part? It’s really comfy!

Be back soon.

Restyled Lamp

7 Aug

So I’ve been working on totally redoing our bedroom and I’m SO close to being finished. I’m loving how it’s coming along but it could definitely use some color. I had some leftover fabric (from recovering our desk chair) that I wanted to use but didn’t really want to use it for pillows. It’s an outdoor fabric so it’s not too soft. Then the other day I looked over at the lamp on the night stand and realized it was just a little bit sad. I mean, it was pretty enough, just not very exciting. That’s when I decided it would be the perfect place to use the fabric.

So the lamp went from this:

image

To this:

image

It was sooo easy I can’t believe it never occurred to me before.

This is what I did.

  • Step 1: I measured the diameter of the lampshade and cut the fabric a few inches longer than that. Also, I left the fabric several inches longer than the total height of the lampshade.
  • Step 2: I wrapped the fabric around the shade and used some old fabric swatch hangers to clamp the fabric on so it would stay in place as I worked. (People totally made fun of me for saving these little hangers by the way and look how handy they are. Uh-Huh.)

image

  • Step 3: I started on one side by applying glue to the inside of the top edge of the shade in small sections and wrapping the fabric over the edge to attach it. I did this all the way around, pulling the fabric tight and smoothing it out on the shade as I went.

image

  • Step 4: Once I got all the way around the shade I just folded in the edge of the fabric to get a clean seam, pulled it tight, and glued it down. Then I trimmed the excess fabric off the bottom still leaving a couple of extra inches.

image

  • Step 5: I took the shade off the lamp, flipped it over, and did the same thing around the other edge.
  • Step 6: Once all the glue dried I cut the extra fabric hanging off the edges and put the shade back on the lamp.

Lamp Before

Funny how such a small change can make such a big difference! It’s like I got a brand new lamp for free!! What do you think?

I’m joining a linky party here. Come check it out!!

image