Tag Archives: spray paint

Spray Paint & Fun Days

25 Oct

So I had some big plans for my off days this week that involved lots and lots of paint. But as it turns out, this weather is just too good and my hubby has the day off work. So we decided to spend the day with our new little guy Brady.

Brady

We adopted him recently from the local Humane Society and he is the best little guy. So we’re gonna go roam around in the Bronco, play at the park and just generally enjoy a rare day off together. Life’s just too short, ya know? So I just have a quick before and after to share this week. I’ll get to the big stuff next week. 

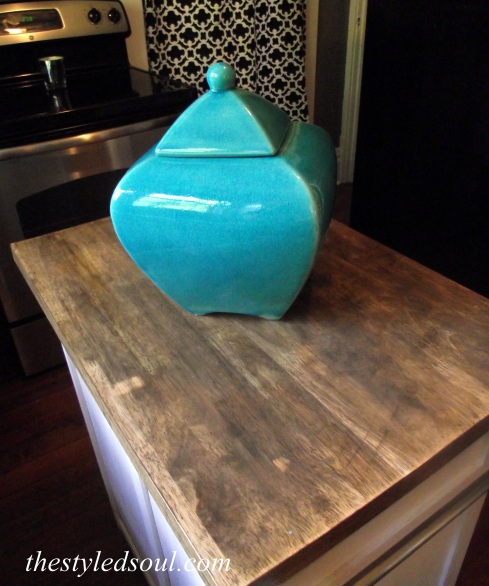
Before 

jar before

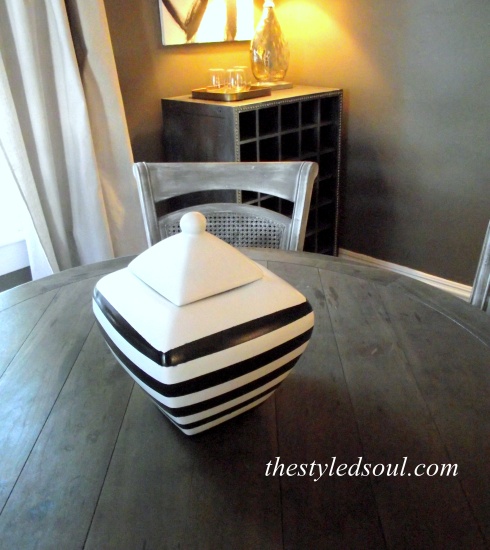
After

jar after

This is why I love spray paint! And painters tape. Have a beautiful weekend!

stephanie

Small Space Solution: DIY Industrial Shelves

7 Jun

DIY Industrial Shelves

I love our home. It’s old and has lots of old house charm but it’s also small and storage space is limited. Because of this I have always struggled with keeping things organized in the kitchen.

After I started painting the refrigerator I started thinking about ways I could make better use of the space next to it. I decided I wanted something taller and with shelves. This would allow us to keep the coffee makers where they are (which frees up counter space) and also give us more storage.

I found this at World Market for $89.99.

wmshelf

I love the looks of it but it just wasn’t big enough. After a little more searching I just couldn’t find anything I wanted in my price range so I decided to make one using the World Market piece as my inspiration.

I found this at Home Depot.
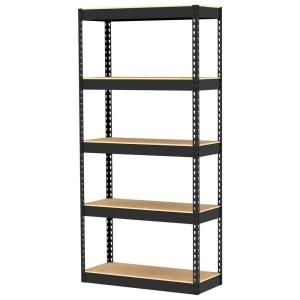
Gorilla Rack

Gorilla Rack Free Standing Storage Unit

The metal is almost exactly the same as the World Market piece which is one reason I chose it. The second great thing about it is that it’s the perfect size for my space and third it claims to hold 250 lbs per shelf.

The makeover was really pretty easy. Spray paint my friends, spray paint. I went with a metallic silver finish because I thought it would look good next to the freshly painted black refrigerator (which is almost finished). I used a combination of the following three spray paints.

  1. Brushed Nickel by Valspar
  2. Dull Aluminum  by Krylon
  3. Hammered Metal by Krylon

I gave it one coat of the brushed nickel followed by a coat of the dull aluminum. Then I randomly sprayed sections of it with the hammered metal. I wanted it to have dimension and look a little less new.

I didn’t want to use the particle board shelves that came with it. I wanted actual wood shelves. So I took one of the shelves to Lowe’s and picked out the type of wood I wanted from the Lumber Isle. Then I just gave the very nice wood cutter guy the particle board shelf  and asked him to make the boards the same size.
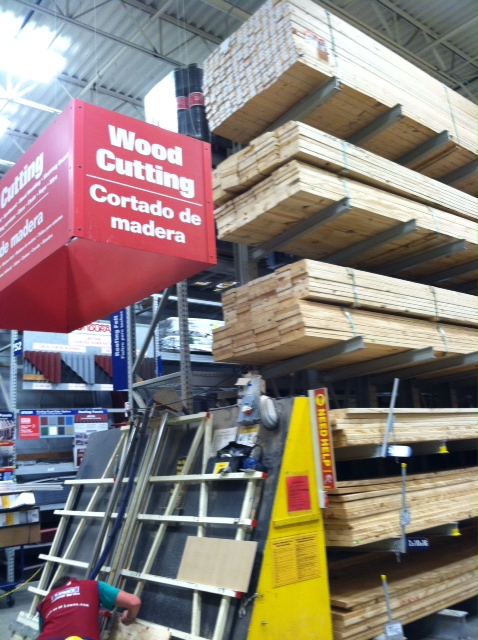
lowes

I love the people that work at Lowe’s!

I chose paint grade pine. I knew it would give me the look I was going for. So I sanded them down and stained them with one coat of vinegar soaked in steel wool then I stained them with a layer of Min-wax in Dark Walnut.

DIY Industrial Shelves

I used the scraps of  wood that were left over when they were cut to test the stains first. Always keeps the scraps so you use them for testing when using a new paint or stain.

I decided I liked the richness of the stain over the vinegar. Now if you are going to be using anything that could get these boards wet, like coffee makers,  then you will want to apply a polyurethane. I recommend Rust-Oleum Polyurethane  in matte finish. It protects the wood really well without any shine.

I let the boards dry overnight before I put anything on them.

DIY Industrial Shelves

DIY Industrial Shelves

DIY Industrial Shelves

DIY Industrial Shelves

DIY Industrial ShelvesDIY Industrial Shelves

After buying everything I needed for this shelving unit I still spent less than I would have on the piece from World Market. Plus it’s bigger and it’s the exact color that I wanted.

If you want to do something like this for your own home you can usually find these shelving units at Home Depot and Lowe’s in various sizes and styles. Home Depot offered free shipping to their store which was perfect for me. You could possibly find these on Amazon as well.

So what do you think? Would you use something like this in your kitchen or do you prefer that everything be hidden?

Have a great weekend everyone and Happy DIYing!!!

These are the fabulous blogs I’m linking up at this week.

GrabButtonLiz

TDC Before and After


Bling-y Bentwood Rocker

25 May

I have a problem. I’m somewhat addicted to gold spray paint. I feel the need to paint ev-er-y-thing gold. It just adds a touch of drama. I love that.

painted bentwood rocker

My dad gave me this old Bentwood rocker and I took it without much excitement.  I put it in the basement and forgot about it for a while until  one day when I just felt the need to paint something.

bentwood rocker

So I took it outside and painted it blue.

blue bentwood rocker

Yeah…not so much. Huge fail.

Then I put it back in the basement and forgot about it for a while. Again. Well, shortly after that my obsession with gold spray paint began and I had been thinking about all the different things I could paint gold. That’s when I remembered the rocker. I’m loving the new glam look.

painted bentwood rocker

So much better than the blue.

painted bentwood rocker

I just covered and taped off the wicker and spray painted the rest with gold metallic spray paint. I used both Valspar and Ace brand paint. Both are terrific spray paints. Then I used a paint brush to paint the wicker in Balboa Mist.

painted bentwood rocker

painted bentwood rocker

I still haven’t decided where it will stay but  I will probably put it in the living room. It would also be a great bedroom chair.  How cute would this be in a little girl’s room?

Do you have a go-to color for spray painting? I would love to know! Leave a link to your projects in the comments section.

Hope everyone has a fun holiday weekend!

This week I’m linking up at some very cool blogs. You should check them out.

http://madeinaday.com/2013/05/23/made-u-look-linky-72/

http://www.classyclutter.net/2013/05/spotlight-saturday-link-party-6.html

http://suburbsmama.blogspot.com/2013/05/sunday-linky-party-9.html

My Uncommon Slice of Suburbia
Liz Marie Blog

startathome.blogspot.com
Stephanie

Pinterest Adventures: DIY Picture Frame Trays

18 May

Do you ever come across something on Pinterest and think to yourself, “That seems so obvious. Why didn’t I think of that”? Well I had one of those moments when I found a pin for a DIY tray.

DIY picture frame tray

I love trays!! They make things look instantly pulled together and are great for collecting all those little things that tend to gather on counters and dressers and basically make me nuts. I like for things to have a home. Well trays are like rentals for things that don’t have a permanent place to live. I guess that sounds kind of weird. Ha!  Ok, anyway.

Tray

myhomelookbook.com

Like I said before,  I found this (above) on Pinterest. It links to a website called myhomelookbook.com. No tutorials, but you really don’t need one. All you need are some picture frames, fabric scraps and spray paint.

If you don’t already have those things they are super easy to find. They’re also cheap, so that’s a bonus. You can pick up some old frames at thrift stores and leftover remnants of pretty fabric at most fabric stores. You could really use fabric from anything. An old shower curtain, a shirt you don’t wear anymore, a pillowcase, whatever.  You could also use scrapbook paper which comes in tons of pretty patterns and colors.

Before

DIY Tray

After

DIY picture frame tray

I made one for the bedroom too. I used this frame.

DIY tray

To make this tray.

DIY picture frame tray

DIY picture frame tray

What I love most about these is that if you get tired of the fabric you can just change it. And they could be used as artwork.

DIY picture frame tray

I will definitely be making some more of these. There are just so many possibilities!! Finally, I have a use for all those fabric remnants I’ve been hoarding. So am I the last person on earth to try this?

Thanks so much to anyone and everyone who stops by to visit my little corner of the web!

Happy Weekend!

Stephanie

Dipped and Fabulous

10 May

Hey there! How was everyone’s week? Mine was kinda busy but I did manage to get a lot done. Including this fabulous little table. dipped end table

Ok so I’m usually a little behind on the trends. This wasn’t even one I was really planning on trying but I just happened to look over by the fireplace and realized I had a black end table next to a black chair. Just seemed like a little too much black going on for one small area.

This is what it looked like after I painted it black but before I moved it next to the black chair.

chalk paint end table

And this is what it looked like when I bought it.

painted end table

I thought this table would look much better painted white but I thought it needed a little something else too. That’s when I remembered the “dipped” trend. I also thought about how much I love a touch of gold.

So after I painted it with two coats of chalk paint in Balboa Mist, my favorite shade of white, I prepped it for the “dipping”. Which isn’t actually dipping at all. (If only it were that easy).

I measured how high I wanted the paint to go up each leg then wrapped it with painters tape. I used Zip Lock bags to protect the top of the legs. I punched a small hole in each one then pulled them up over the legs and secured them tightly with tape.

dipped end table

Then I wrapped the rest of it in plastic and secured it with tape.

dipped end table

Finally, on to the easy part. I sprayed each foot with two coats of Valspar Metallic Gold spray paint letting them dry between coats. All that was left was to apply two coats of Minwax polyurethane in a matte finish.  I decided to leave the hardware white. I didn’t want to take away from the gold. Plus I just think the white on white is pretty.

In case you didn’t notice, I used the coral lamp that I used to have in “the lounge”. It looks so much better on that white table and it gives that little corner the perfect touch of color.

dipped end table

dipped end table

DSCF3441a

dipped end table

dipped end table

Much better. Oh, and yes I realize the  rug is too small. I just wanted to cover the vent for better photos. It’s just a prop stolen from another room :)  So what do you think? Have you ever “dipped” a piece of furniture?

Hope everyone has a happy weekend and a fabulous Mother’s Day!!

Stephanie

Guest Room Update

12 Jan

So I’ve been trying to get our guest room under control for a while. Not that we  have overnight guests that often but you know,  just in case. It’s really just a room where I keep my clothes and there happens to be a bed in there.  So it’s a guest room/my (totally messy unorganized) closet. It pretty much always looks like a clothes-bomb exploded in there.  Anyway, I wanted to put a pretty dresser in this room since I needed some storage and when I came across this one at a thrift store I knew it was perfect and I knew I wanted it to be white.

I started by applying two coats of primer. Then I applied  two coats of a creamy white semi-gloss. After that I dry-brushed one coat of a flat bright white, just to take away a little bit of the shine and to give it  a little dimension.

DSCF2270

Then I painted the hardware with the pewter Rub n Buff I got for Christmas from my sweet husband.

DSCF2196

I had never used Rub n Buff before but have always heard great things about it. Turns out they are all true. This stuff is awesome! It was so easy. I just applied it with my fingers then let it dry for a couple of hours.

This is what it looked like when I bought it.

DSCF3366

And this is what that corner of the room used to look like.

039

The mirrors hanging above the dresser are all from yard sales. I spray painted the black one and the square silver one.

DSCF2307

I would love to have a huge wall of  vintage mirrors one day. You know, like something you would see in Elle Decor or House Beautiful. These will have to do for now.

DSCF2304

DSCF22761

DSCF2274

 Now that I have the dresser wrapped up I have some other ideas for this room. Like making a headboard, organizing the closet, maybe a chest of drawers……

Be back soon!

sig1

Finished! DIY Christmas Decor

21 Dec

Well here we are. Just FOUR days until Christmas!! I am feelin’ the Christmas spirit like nobody’s business. I have been knee-deep in wrapping paper and DIY decor. I have finished decorating, shopping and (almost) wrapping. I even got Christmas cards sent out this year.

card

I had this made at cardstore.com and got a GREAT deal. Just a little FYI.

Like I told you last time I wanted to do a lot of handmade decorating this year. My goal was to use what we have and spend very little money. Well the only thing I ended up spending on was the tree, a few ornaments and miscellaneous items at a thrift store,  and ribbon. Everything else we already had or I took from the yard.

So you’ve already seen the mantle when I posted my DIY stockings but you probably didn’t see the leaves that I spray painted silver or the branches that I spray painted white and covered in white glitter. The greenery in the vases were pulled from the base of our Christmas tree (we had to remove some anyway to fit it in the stand) and the vases are from our wedding. Two of the candlesticks were purchased at a thrift store and everything else we already had.

DSCN1333

DSCN1563

DSCN1566

These little guys used to be green and yellow. I simply spray painted them white then filled the larger one with more branches from the bottom of the tree. Then I added these swirly floral accents and pearly floral accents I bought a few years ago at Hobby Lobby. I decided to leave the other one empty.

DSCN1552

DSCF4868

Vases before.

I also had this gold tray that I had spray painted silver a while back. I thought it would be perfect to turn into a holiday centerpiece. So I filled a candle holder with silver and gold ornaments, tied together a grouping of white ornaments and  clear ones that are stuffed with white feathers and scattered it around the little beige vase and put a couple of feathers in that. The white wood accents are pulled from the dining room (that I still haven’t finished).

DSCN1510

DSCN0714

Tray before.

This one is my favorite. This is our sassy little kitchen tree. I got this tree a couple of years ago for $5.00! The base is wrapped with sheers from Ikea and the little reindeer underneath were purchased at a thrift store for $1.39 for the pair. The ornaments are from a thrift store and I bought the ribbon at Hobby Lobby when it was half price.

DSCN1445

So now that I’m finished, and still have a few days before Christmas to enjoy it, I might actually try to do some holiday baking. I’ll let you know how it turns out.

DSCN1533

DSCN1454

DSCN1545

May your holidays be filled with love, peace and blessings!

Merry Christmas to you and yours!

sig1

Coastal Inspirations

15 Sep

So we are back from a week at the beach but I still have beach livin’ on my mind. The sounds, the scents, the colors, oh how I love all that beachy goodness. Everything about being at the beach is so inspiring. I used to dream of living in a home that was straight out of Coastal Living.

image
Well my taste has changed a little since then but I still LOVE all things coastal. So I brought back a few things that would add a little coastal charm to our home.

Seashells! (of course)

One morning as I was walking I found a couple of these awesome shells. Are these capiz shells? (If anyone knows please comment below). And why have I never noticed these before? I thought if I could find enough of these they would look really cool in some sort of glass dish or jar in the dining room. Still haven’t finished the dining room but that’s another story.


Next, I found these!

The colors and shapes of these have a great coastal feel and they are perfect for collecting small things like jewelry, keys, and makeup brushes. The best part is that they were only $1.00 each! I found them at this cute little thrift store near the beach. They had SO MANY things I loved and lots of great furniture, such as …

THIS!


I found this little chair sitting outside the thrift store just waiting for me. I’m a sucker for anything wicker, cane, or bamboo. Hello gorgeous! The chair and cushion are both in great shape and it’s actually really comfortable it just needs some paint and new fabric. I can’t wait to get started on this I just have to decide what I want to do with it..so many possibilities!!

So, after a week of relaxation, great food, and much needed time spent with my little family I’m feeling thankful, inspired,  and ready to tackle some projects.

image

image

image

So long summer…..

$8.99 Side Table

23 Aug

So I found this great little table at a local thrift store and for $8.99 I couldn’t pass it up.  I knew I would either use it as a nightstand or in the living room. Well since we didn’t HAVE an end table in the living room I thought that would be a better option.  Here it is!

It had a standard oak finish, was pretty damaged on the top, and OH MAN it smelled like smoke. So I gave it a good cleaning and used my power sander to sand it down.  After I sanded it I gave it two coats of homemade chalk paint in Dark Kettle Black by Olympic paint. Then I applied a coat of Minwax polyurethane since I wanted it to have a shiny finish.

Once it was dry I spray painted the drawer pulls white using two coats of Valspar white gloss spray paint. I wanted to give it a little bit of a modern look.

Loving my little $8.99 side table!! What do you think?