$40.00 Bathroom Mini-Makeover

27 Jul

Bathroom Mini Makeover

Bathroom After

Recently I mentioned that Garden Ridge just opened up in the neighborhood. On my recent shopping trip I found tons of great things to be had but this is one of the few things I actually left with.

Shower curtain

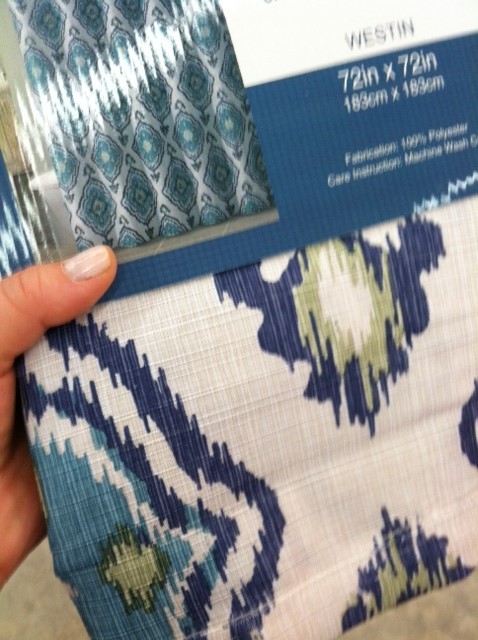
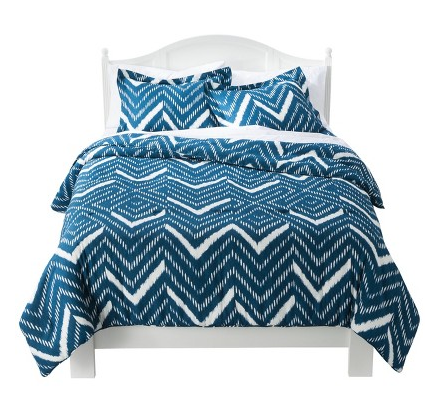
I love love love ikat or anything ikat-ish and lately I’ve been feeling indigo blue. When I saw this I knew that I wanted to use it in the upstairs bathroom. Especially since I already had this paint sample from Lowe’s.

Valspar Pine Green

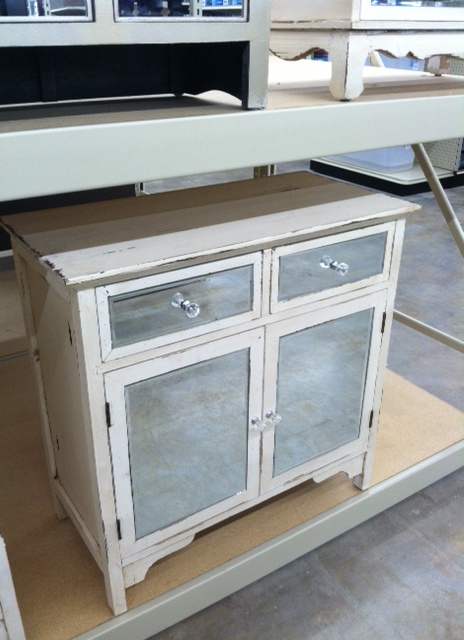
I picked  it up when they were giving away free samples in the spring. I had been thinking about using it to paint a small cabinet that I wanted to use in the bathroom and when  I found that shower curtain I knew it would be per-fect.  Except I’m not using it as a shower curtain. I bought two of them to use as panels over the window shades.

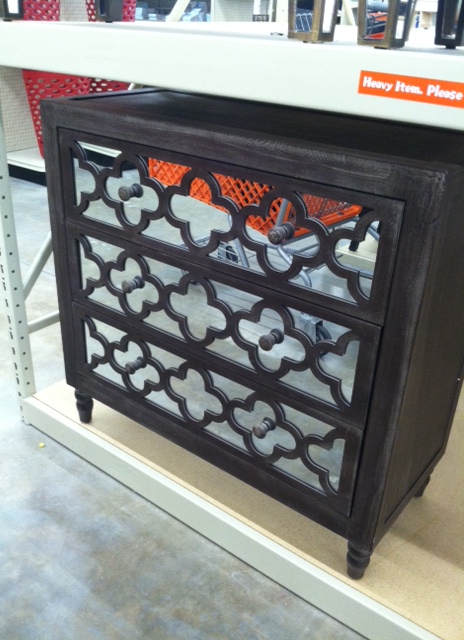
This is the bathroom before. This cabinet was all kinds of wrong in here. Too tall and not a great color.

Bathroom Before

And now!

Bathroom After

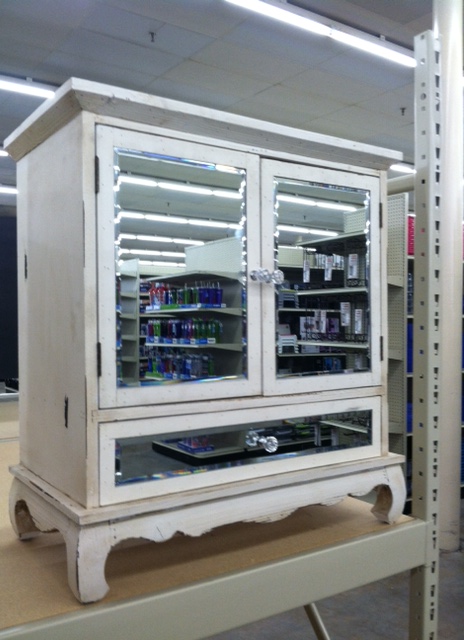
Here is a before and after of the small cabinet.

Cabinet before

Pine Green Painted Cabinet

This cabinet used to be in the downstairs bathroom but that’s going to be getting a big makeover soon. OK , so that’s not all.  I also made some simple DIY art.

DIY Art

The one on the left is a card that we received with one of our wedding gifts and the one on the right is a picture from a wedding magazine that I had from planning our wedding. I already had the frames but one of them did get a coat of spray paint.

 I love turning personal items into artwork. Especially a card, since I know that underneath the glass are the sweet words of a friend.  (FYI, we got married six years ago.)   I also hung a DIY sunburst mirror on the wall above the bathtub. It’s so fun! It peeks out from between the shower curtains.

DIY Art

I painted the corners of the little leaning mirror (on the right) with Rub n Buff in Silver Leaf AND I painted the frame of the medicine cabinet mirror in the same color. The wooden letter that’s behind the sink (it’s hard to tell in the photo but it’s a Q) was purchased in the clearance aisle of Hobby Lobby for $.75.

Pine Green Painted Cabinet

Frog Tape Painted Cabinet

I’m thinking the wall still looks a little empty so I might go ahead and just turn that into a gallery wall. Otherwise, I’m pretty happy with the way it turned out. All in all I only spent around $40.00 to update the bathroom by using mostly things we already owned. That’s my kinda makeover.

Oh I should mention, the original makeover of this bathroom was done several years ago by my husband and his brother. New flooring, faux concrete counter….those guys can do anything. Seriously they could have their own show. 

Happy Weekend!

You can find me linking up this week at the following awesome blogs.

Suburbs Mama

Liz Marie Blog

The Shabby Nest

DIY Showoff

Give Me the Goods Monday at Rain on a Tin Roof

The Blissful Bee


 photo name_zpse215d949.png

Here I Go Again

22 Jul

I’m back at it again. Making more design boards for the bedroom. I still haven’t decided if I want to leave the room painted Bittersweet Chocolate or repaint it a lighter shade. Lately I’ve been finding myself drawn to white rooms. There is just something so fresh and clean-looking about a white room.

It makes me think of that song by the Dixie Chicks, Wide Open Spaces. Except in my brain it goes, WHITE Open Spaces. Yeah, that song is gonna be stuck in your head all day. You’re welcome. Anyway…..what I’m thinking about now is leaving one wall Bittersweet Chocolate and painting the rest of the room a soft white. Maybe ;)

Here is my latest design board for the bedroom. 

Styled Soul bedroom design board

This is the plan:

  • Reupholster the headboard in a coral ikat fabric.
  • DIY some white window panels with some type of gold border.
  • Hang some antiqued mirrors/frames. 
  • Bring in my DIY capiz shell chandelier from our little home office.
  • The indigo blue will come from the Nate Berkus bedding I already own. (I know what you’re thinking but it’s working in my mind.)
  • Buy one of these chests I found at Garden Ridge. 

grey mirrored chest garden ridge white mirrored chest garden ridge distressed white mirrored chest garden ridge mirrored chest garden ridge

These chests are all $199.00 or less! So happy they moved into the neighborhood!

The white dresser is from my guest room and I should be able to pick up some mirrors and picture frames at a thrift store for practically nothing.

That’s the plan for now. Just gotta get it done!

 photo name_zpse215d949.png

Coral Chest: My Obession Continues

17 Jul

coral painted chest

As my obsession with coral gets totally out of control I find myself wanting to use more of it in every room.  I am totally obsessed with coral. I found this chest at a thrift store and it was in great condition. It’s the perfect size for the guest room and it has a decent amount of storage space. It was screaming to be painted coral.

This is the before.

thrift store chest

Once I got it home and started painting it I was pretty surprised to find this.

coral painted chest

It’s from Pier One! I’ve never bought any furniture from Pier 1 and this piece is the real deal. It’s actual wood.

I painted this piece starburst orange which is a Benjamin Moore color but I used a combination of Valspar and Glidden paints.

Since I wanted to use the original ring pulls WITHOUT the plates behind them I had to make an adjustment. I used Plastic Wood to fill in the holes that had been drilled to hold the plates. Plastic Wood is perfect for this kind of job because it can be painted or stained.  Once it was sanded and painted there was zero evidence of the outer holes.

wood filler to change hardware

I spray painted the pulls with metallic gold spray paint by Ace Hardware.

Gold spray paint & Rub n Buff

Then I used Rub-n-Buff in gold leaf to paint these weird little accents.

gold leaf rub n buff

Much better.

It’s perfect next to my little chair with the DIY spot fabric.

coral chest before and after

painted coral chest

I finally have a little extra storage for my clothes which means it doesn’t constantly look like a clothes bomb exploded in here. So are you obsessing over anything lately? I would love to know I’m not the only one!

I’m linking up this week at the following AMAZING blogs.

Liz Marie Blog

Miss Mustard Seed

Suburbs Mama

Finding Fabulous

DIY Showoff

Give Me the Goods Monday at Rain on a Tin Roof

A Stroll Thru Life

The Blissful Bee

Domestically Speaking

Not Just a Housewife

Start at Home


 photo name_zpse215d949.png

Are you on Bloglovin’?

5 Jul

lola

Are you on Bloglovin? If you follow several blogs, or have one of your own, you should be. It’s a GREAT way to stay updated on all the blogs you love.

You can find me there. Just click on the link below to sign up.

Follow my blog with Bloglovin

Hope to see you there!

 photo name_zpse215d949.png

Southeastern Salvage

4 Jul

Just wanted to share a little about a place I love to go. It’s called Southeastern Salvage. They carry a mix of building materials, furniture, and accessories. Oh, and they have free popcorn.

 Even if I don’t buy  anything I always leave a happier person. You won’t find them in every city but if there is one near you, and you haven’t been, you need to check it out. You don’t get a lot of info on the website about what is actually in the store and that’s because the inventory changes a lot. So here is a SMALL sampling of the awesome things they have in stock right now, at the Chattanooga location.

 photo 40EE1CBD-456A-491A-B71C-00DBF9927C16-5194-000003219AB5F1C3_zps429689f7.jpg

LOVING these Moroccan lanterns and decorative driftwood balls.

 photo 39A0F34A-5550-4581-84BF-0119CA5A73E2-5194-0000032171249C06_zps4ddb13c4.jpg

I’ll take anything tufted or with nail trim.

 photo D5325A3A-2875-4F3F-9996-02AE3209EC76-5194-00000321694F66C3_zps3581aa4e.jpg

Don’t even get me started on the Union Jack. I never get tired of seeing that in design.

 photo 76894DE0-28BF-4648-9FE9-4FF5131370AF-5194-0000032128CF0B24_zpsb3b5a867.jpg

Whitewash? Yes please!

 photo E6A5C553-49B7-4223-803F-66B03AC0D465-5194-000003214BF15DFB_zps927c636b.jpg

I feel like I NEED this leather sofa in my life but it would take up our ENTIRE living room.

 photo 97F26581-0D1C-41F1-9A18-C46B7D9B6BED-5194-0000032109542924_zpsaa2d5279.jpg

Cute pillows for $8.00! I mean, come on! How awesome is this stuff? The prices on most things are pretty good, especially the accessories.

driftwood ball

I bought this for $3.00.

I probably would have spent more time looking around (and getting better pictures) but I had to get this little bear to the vet.

 photo 83E0C3D5-D931-4A95-BDF4-3306B0E37C96-5194-0000032283793C4C_zps09bcf8cb.jpg

So go check it out and if you do let me know what kind of great goodies you find.

 photo name_zpse215d949.png

DIY Painted Spot Fabric

2 Jul

DIY painted fabric

Have you noticed a trend in fabric lately? This really cool black and white spotted fabric that’s half polka dot half cheetah print? It has such an eclectic chic vibe.

black white spot wallpaper

I’m drooling over these images from pinterest.

tommy smythe living room

How amazing are these chairs in this living room by Tommy Smythe?

spot pilliw furbish

I’m loving this pillow from Furbish Studio.

I was feeling super inspired by all these looks. I LOVE this fabric and was dying to use it somewhere.

spot fabric

I found this great fabric at Warehouse Fabrics Inc.

I could have ordered a yard of it but I just happened to have some white fabric and of course I had some basic black paint. So I decided to make my own ;)

It was super easy. Seriously,  if I can do this anyone can. These are the things you will need.

  • Fabric
  • Paint
  • A basic sponge
  • Scissors
  • Paper plates
  • Paper towels

Take a basic cleaning sponge and pull it apart lengthwise so it isn’t as thick. Then cut out two or three circles. They don’t have to be perfect.

painted fabric

Next,  iron your fabric and lay it on a flat surface. Pour some paint into a paper plate and place an empty paper plate next to it (this is where you will keep your sponge circles) along with some paper towels.  Now that the set up is ready you can start the “painting” process.

I didn’t really go with a pattern since I wanted the spots to look kind of random. I just started in the center and worked my way out. I had three pieces of sponge cut out and I started with the biggest one. I dipped the sponge in the paint, pressed the excess off on the paper towel then pressed the “spot” onto the fabric. I could get about two or three spots on the fabric from each dip in the paint but I did have to go over some of the spots that didn’t look like they had enough paint.

This is what it looked like just after I started.

painted fabric

And this is what it looked like when I was finished.

DIY Painted spot fabric

I just hung it with a clipped pants hanger to dry overnight then I covered this little chair seat with it.

diy painted fabric

DIY painted fabric DSCF3936a

Maybe next time I’ll try it on the wall. Should I?!?!

 photo name_zpse215d949.png

A Little Somethin’

15 Jun

I’ve had this chest for-e-ver. With my new motivation to finish our bedroom I decided it was time to give it a makeover.

DIY nail trim chest

This is what it used to look like.

BEFORE

DIY painted nightstand

painted nightstand before

I finally painted it. White. I know, nothing super exciting. After I painted it I was kinda like, that’s it?

It just needed a little something else. So I added some nail heads. Just on the corners. I used the singles that I had left over from my wine cabinet makeover.

NOW

DIY nailhead trim nightstand

DIY nailhead trim

DIY nail trim accents

DIY nail trim accent

DIY Nail Trim Accent

The top was pretty beat up and still looked a little rough after I painted it. It also has a lot of “worm holes”.  So I thought it would look kind of cool to add a modern element to a piece that has a “worn” and traditional look.

It was so easy. I just hammered each one in with a rubber mallot. I think that gave it a little extra oomph. Sometimes you just need a little extra somethin’.

Happy Weekend Everyone!!

 photo name2_zpsf5f56755.png

I Have No Idea What I’m Doing

10 Jun

Here I go changing my mind again. I just CAN’T decide what I’m doing about our bedroom.

I was going for something like this.
black white brown bedroom

decor pad

So I painted the room Bittersweet Chocolate.

Bittersweet Chocolate

But then I found this bedding.

Nate Berkus Bedding

Nate Berkus

I fell in love with it and was thinking I wanted to mix it with some pretty yellows but that just wouldn’t work with the Bittersweet Chocolate.

Plus I’m still not over my obsession with coral-y pinks. So I put this together on Olioboard.

grey coral indigo bedroom

I love this paint color called Storm but I really don’t want to paint again. I know, I’m all over the place. So my dilemma: Do I work with the Bittersweet Chocolate or paint the room? Again.

 photo name2_zpsf5f56755.png

Small Space Solution: DIY Industrial Shelves

7 Jun

DIY Industrial Shelves

I love our home. It’s old and has lots of old house charm but it’s also small and storage space is limited. Because of this I have always struggled with keeping things organized in the kitchen.

After I started painting the refrigerator I started thinking about ways I could make better use of the space next to it. I decided I wanted something taller and with shelves. This would allow us to keep the coffee makers where they are (which frees up counter space) and also give us more storage.

I found this at World Market for $89.99.

wmshelf

I love the looks of it but it just wasn’t big enough. After a little more searching I just couldn’t find anything I wanted in my price range so I decided to make one using the World Market piece as my inspiration.

I found this at Home Depot.

Gorilla Rack

Gorilla Rack Free Standing Storage Unit

The metal is almost exactly the same as the World Market piece which is one reason I chose it. The second great thing about it is that it’s the perfect size for my space and third it claims to hold 250 lbs per shelf.

The makeover was really pretty easy. Spray paint my friends, spray paint. I went with a metallic silver finish because I thought it would look good next to the freshly painted black refrigerator (which is almost finished). I used a combination of the following three spray paints.

  1. Brushed Nickel by Valspar
  2. Dull Aluminum  by Krylon
  3. Hammered Metal by Krylon

I gave it one coat of the brushed nickel followed by a coat of the dull aluminum. Then I randomly sprayed sections of it with the hammered metal. I wanted it to have dimension and look a little less new.

I didn’t want to use the particle board shelves that came with it. I wanted actual wood shelves. So I took one of the shelves to Lowe’s and picked out the type of wood I wanted from the Lumber Isle. Then I just gave the very nice wood cutter guy the particle board shelf  and asked him to make the boards the same size.

lowes

I love the people that work at Lowe’s!

I chose paint grade pine. I knew it would give me the look I was going for. So I sanded them down and stained them with one coat of vinegar soaked in steel wool then I stained them with a layer of Min-wax in Dark Walnut.

DIY Industrial Shelves

I used the scraps of  wood that were left over when they were cut to test the stains first. Always keeps the scraps so you use them for testing when using a new paint or stain.

I decided I liked the richness of the stain over the vinegar. Now if you are going to be using anything that could get these boards wet, like coffee makers,  then you will want to apply a polyurethane. I recommend Rust-Oleum Polyurethane  in matte finish. It protects the wood really well without any shine.

I let the boards dry overnight before I put anything on them.

DIY Industrial Shelves

DIY Industrial Shelves

DIY Industrial Shelves

DIY Industrial Shelves

DIY Industrial ShelvesDIY Industrial Shelves

After buying everything I needed for this shelving unit I still spent less than I would have on the piece from World Market. Plus it’s bigger and it’s the exact color that I wanted.

If you want to do something like this for your own home you can usually find these shelving units at Home Depot and Lowe’s in various sizes and styles. Home Depot offered free shipping to their store which was perfect for me. You could possibly find these on Amazon as well.

So what do you think? Would you use something like this in your kitchen or do you prefer that everything be hidden?

Have a great weekend everyone and Happy DIYing!!!

These are the fabulous blogs I’m linking up at this week.

GrabButtonLiz

TDC Before and After


Bling-y Bentwood Rocker

25 May

I have a problem. I’m somewhat addicted to gold spray paint. I feel the need to paint ev-er-y-thing gold. It just adds a touch of drama. I love that.

painted bentwood rocker

My dad gave me this old Bentwood rocker and I took it without much excitement.  I put it in the basement and forgot about it for a while until  one day when I just felt the need to paint something.

bentwood rocker

So I took it outside and painted it blue.

blue bentwood rocker

Yeah…not so much. Huge fail.

Then I put it back in the basement and forgot about it for a while. Again. Well, shortly after that my obsession with gold spray paint began and I had been thinking about all the different things I could paint gold. That’s when I remembered the rocker. I’m loving the new glam look.

painted bentwood rocker

So much better than the blue.

painted bentwood rocker

I just covered and taped off the wicker and spray painted the rest with gold metallic spray paint. I used both Valspar and Ace brand paint. Both are terrific spray paints. Then I used a paint brush to paint the wicker in Balboa Mist.

painted bentwood rocker

painted bentwood rocker

I still haven’t decided where it will stay but  I will probably put it in the living room. It would also be a great bedroom chair.  How cute would this be in a little girl’s room?

Do you have a go-to color for spray painting? I would love to know! Leave a link to your projects in the comments section.

Hope everyone has a fun holiday weekend!

This week I’m linking up at some very cool blogs. You should check them out.

http://madeinaday.com/2013/05/23/made-u-look-linky-72/

http://www.classyclutter.net/2013/05/spotlight-saturday-link-party-6.html

http://suburbsmama.blogspot.com/2013/05/sunday-linky-party-9.html

My Uncommon Slice of Suburbia
Liz Marie Blog

startathome.blogspot.com
Stephanie